Engine oil keeps parts moving smoothly and prevents friction-related damage. If oil is too low, the engine can overheat, parts can wear out, and repairs get expensive. Too much oil can also cause problems, including foaming and leaks.
Regular checks help your engine run better, last longer, and reveal leaks or other issues early. This guide explains how to check the oil level with a dipstick, different ways to verify the level, and the best time to do it. Checking your oil is simple and takes only a few minutes.
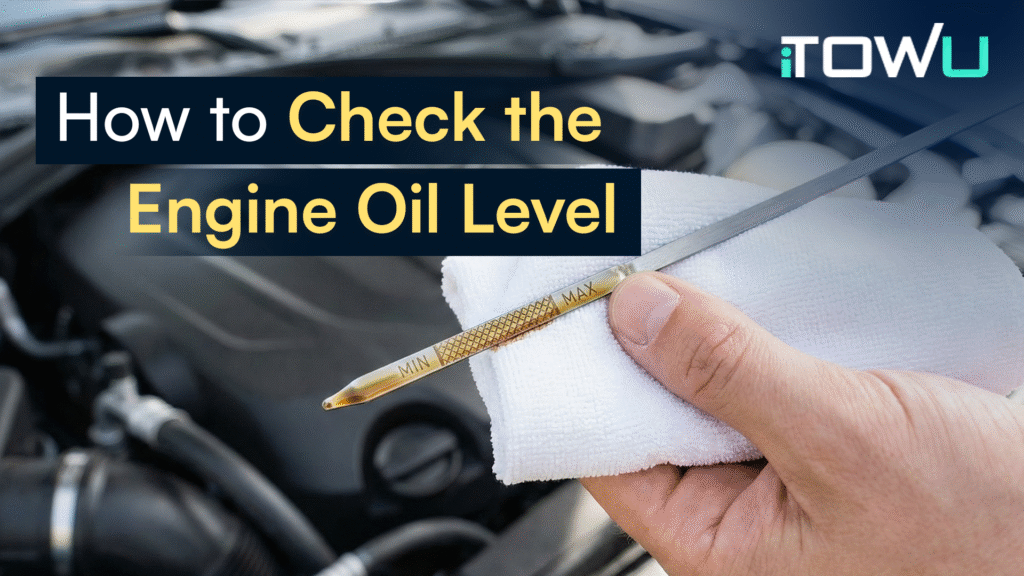
How to check the engine oil level using a dipstick
Regularly checking your engine oil is an easy habit that protects your car. When you do it the right way, you can spot problems early and keep the engine running smoothly. Here are the steps:
Step 1: Park on a flat surface
Make sure your car is on flat ground. It lets the oil settle evenly inside the engine. If the vehicle is on a hill, oil can pool to one side and make the dipstick read too high or too low. Flat ground gives you an accurate reading, so always start here.
Step 2: Turn off the car engine and wait a bit
After you park, turn off the car and wait about 10–15 minutes. This allows warm oil to drain back into the oil pan. If you check too soon, the oil may still be moving, which can make the reading inaccurate. A short wait makes the level more accurate.
Step 3: Open the hood and find the dipstick
Pop the hood and look for the dipstick. It usually has a brightly colored (yellow or orange) handle and may be easy to spot; in some vehicles, it’s tucked deeper. If you can’t find it, check your owner’s manual for the exact location. Once you see it, you’re ready for the next step.
Step 4: Take the dipstick out and wipe it clean
Pull the dipstick all the way out. It will have residual oil on it from before; wipe it clean with a paper towel or cloth. This first pull is not the one you read. Cleaning gives you a fresh start, so the next reading is clear.
Step 5: Put the dipstick back in and pull it out again
Slide the dipstick back in and push it down until it stops. Then pull it out again. Hold it steady and look at the oil level. Most dipsticks have two marks (e.g., “MIN/LOW” and “MAX/FULL”). The oil should be between those marks. If it’s near the top, you’re good; if it’s close to the bottom line, you need more oil.
Step 6: Look at the oil’s color and feel
While checking the level, also note the oil’s condition. Fresh oil is usually golden or light brown; older oil turns dark. If the oil feels gritty or smells burnt, it may be time for an oil change. Clean oil helps engine parts move smoothly, so watch for signs that the oil is degrading.
Step 7: Add oil if the level is low
If the level is at or below the minimum line or very close to it, add the oil. How to add the oil? You open the oil cap on top of the engine and put a funnel in. It is used to avoid spills. Pour a little at a time, then wait a moment and recheck the dipstick until the level is somewhere between the MIN and MAX (ideally near the middle or the top). For the type of oil, you should use the oil grade/spec recommended in your owner’s manual. When finished, tighten the oil cap and return the dipstick to its tube.
If you prefer a professional to handle the oil change, then schedule one right from your phone with the iTOWu app, plus get 24/7 roadside help (towing, fixing/replacing tires, fuel delivery, etc.) when you need it.
Step 8: Repeat the check regularly or before trips
Checking your oil regularly helps you catch problems early. Try to check it at least once a week (or at least a month) or before long trips. Long drives can consume more oil, so it’s good to confirm the level is safe before you head out.
Step 9: Keep small supplies in your car
It’s smart to keep a simple oil change kit in your trunk: a small bottle of the correct engine oil, a funnel, and a cloth or paper towels. If you notice the oil getting low while traveling, you can top it up right away.
Other ways to check your car’s engine oil level
Newer cars sometimes skip the dipstick and use dashboard systems instead. Some models display a digital oil level readout you can check without opening the hood, while many still rely on an oil pressure warning light (if that light comes on, pressure may be low, and you should check the oil immediately). You may also see an oil-life monitor, which estimates when an oil change is due; note that oil life is different from oil level or pressure. Beyond the dash, look for signs around the vehicle. Dark spots under the car can indicate a leak. Ticking or knocking noises may point to low oil or low pressure, and blue smoke or a burning oil smell is another warning. If you’re unsure, stop by an auto shop. They can check the level quickly and advise on any issues.
Should you check the oil when the engine is hot or cold?
For an accurate reading, you should check when the oil is cold or after the engine has been off for 10-15 minutes on level ground. That pause and the level ground let the oil drain back to the pan so the dipstick reflects the true level and helps prevent overfilling. Always follow your owner’s manual if it specifies a particular procedure for your vehicle.
Final Check
The process to check the engine oil level on your car is quick and easy, as explained above.
All you have to do is park on flat ground, let the engine cool, pull the dipstick, wipe it clean, reinsert it, pull it back again, and read the oil level. But some newer cars have digital oil monitors, but the dipstick remains the most reliable. Regular oil checks help prevent engine damage, improve performance, and save money on repairs.
For more tips, see our guides on when your car needs an oil change and synthetic vs. conventional oil. Staying on top of oil maintenance keeps your engine healthy for years.